Labels

Showing posts with label Looks. Show all posts

Saturday, 8 June 2013

Summer Sunset

Morning All,
summer is coming and this make me feel like wearing warm colours on my eyes :-)
enjoy!

Buongiorno miei cari,
l'estate è alle porte e ho proprio voglia di colori caldi!!
spero vi piaccia!


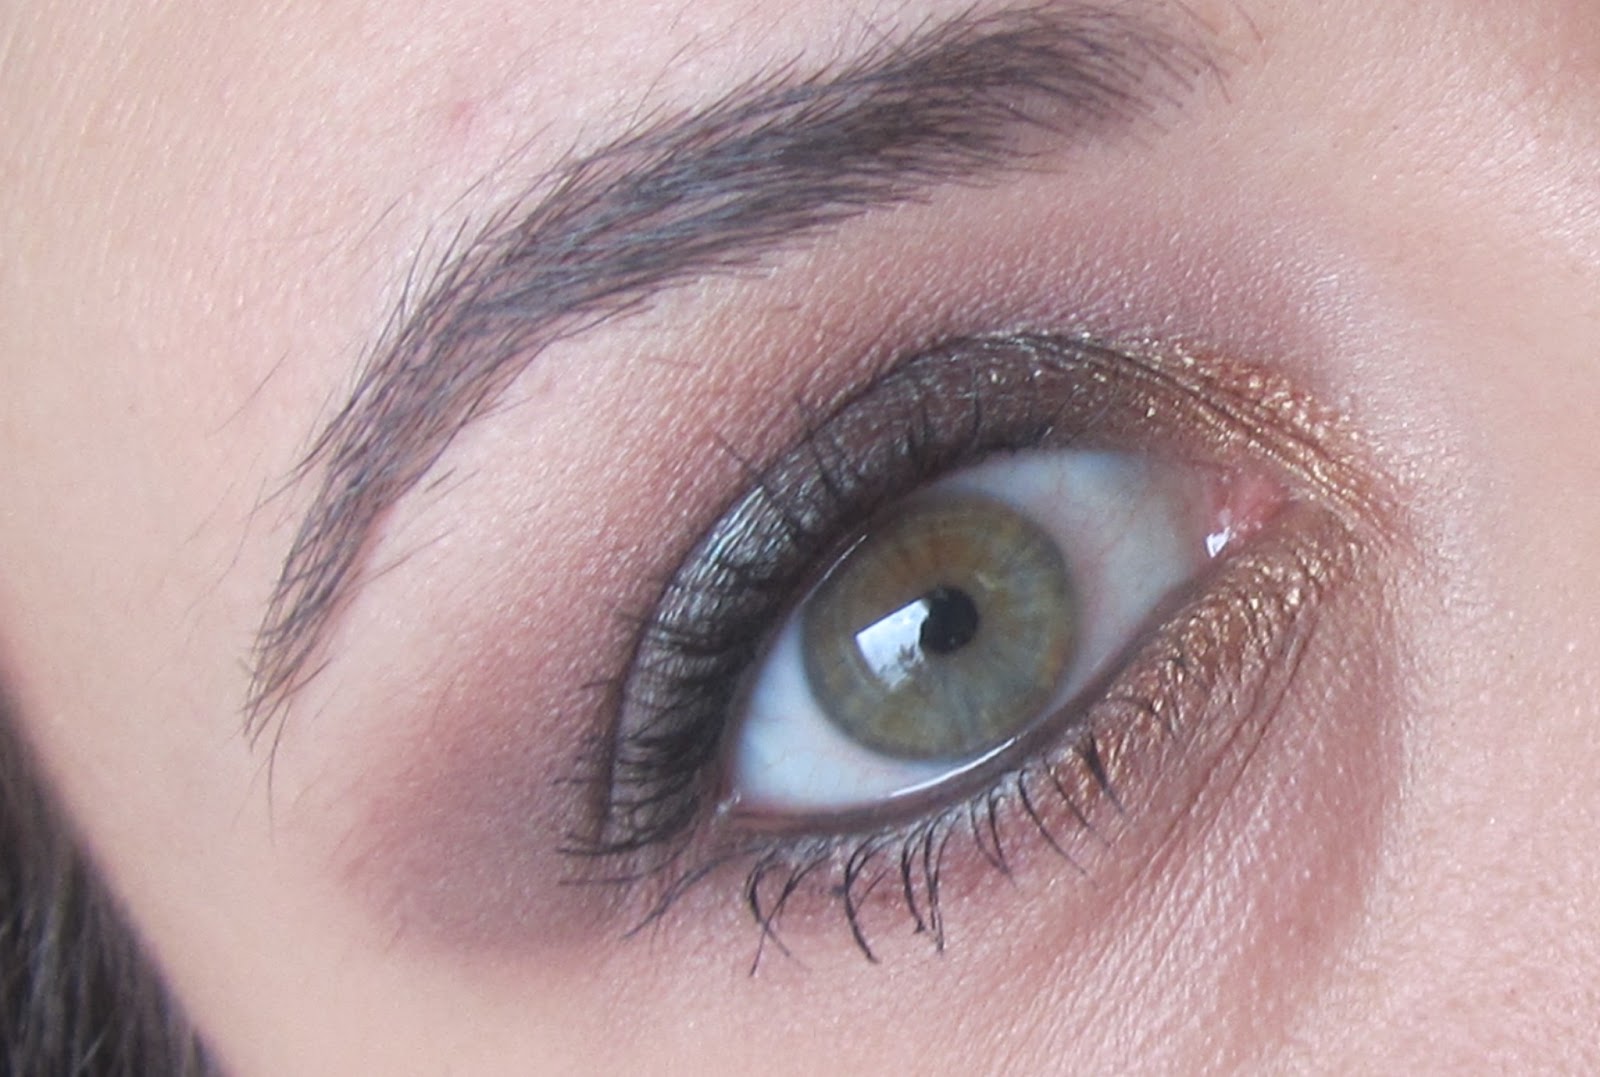
1- Prime the eye lid to give more intensity to the eye shadow and better staying power.
2- Apply Mac Expensive Pink all over the eye lid and along the lower lash line.
3- Then blend Mac Pink Freeze along the brow bone down to the inner corner of the eye.
4- Tip the eye shadow brush into Mac Coppering and lightly blend it in the outer corner, where Pink Freeze and Expensive Pink meet to add intensity and to join the 2 colours together.
5- Add Stila eye shadow in Batura along the upper lash line to make the roots of the lashes looking thicker and fuller.
6- Line the water line with a brown pencil - I used Bourjois Brun Design - and add a tiny amount of a violet eye shadow in the centre of the lower lash line - I used Bourjois in Violet Absolu.
7 - Finish off with plenty of mascara, a peach matte blusher and a coloured lip butter, go out and enjoy!

1- Applico una base o un primer sulla palpebra mobile per maggiore intensità dell'ombretto e maggior tenuta.
2- Stendo poi Expensive Pink di Mac su tutta la palpebra e lungo le ciglia inferiori, meglio se bagnando prima il pennello.
3- Successivamente, con un pennello da sfumatura, applico con mano leggera Pink Freeze di Mac sull'arcata sopraccigliare e nell'angolo interno dell'occhio.
4- Per intensificare l'angolo esterno invece aggiungo Coppering di Mac, questo aiuta anche a sfumare insieme ed armonizzare Pink Freeze e Expensive Pink.
5- Delineo la base delle ciglia con Batura di Stila utilizzando un pennellino angolato.
6- Applico la matita marrone nella rima interna dell'occhio e sfumo leggermente un ombretto viola solo nella parte centrale della linea inferiore delle ciglia.
7- Completo il tutto con mascara, un blush opaco color pesca e un lip butter colorato! 
p.s. la lista completa dei prodotti è in fondo alla pagina!


Eyeshadows, Clockwise: Bourjois Violet Absolu, Mac Pink Freeze, Mac Coppering, Mac Expensive Pink, Stila Batura
Swatches, Top, Revlon Lip Butter in Berrie Smoothie, Mac Melba Blusher, Bourjois eye pencil in Brun Design
List of products used: 
Mac Moisture SPF 15 Foundation NC25
Mac Select Moisture Cover NC20
Mac Eye Shadow in Pink Freeze - Light Lilac
Mac Eye Shadow in Coppering - Coppery Red
Mac Eye Shadow in Expensive Pink - Orangy Pink
Stila Eye Shadow in Batura - Dark Violet
Rimmel Scandaleyes Mascara
Rimmel Wake Me Up Concealer
Rimmel Hide The Blemish Concealer - Soft Honey
Elf Mineral Booster in Sheer
Revlon Colourburst Lip Butter in Berry Smoothie
Bourjois Eye Pencil in Brun Design 
Bourjois Eyeshadow in Violet Absolu 


Friday, 29 March 2013

Miss Dior - 'La vie en rose'


Morning All, 
I was mesmerized by Nitalie Portman and her make-up in the Miss Dior Perfume commercial, so chic and "simple" that I was forced to recreate it!
I mainly used colours from the Sleek Storm Palette -link here
and I am sure the Dior Crew did too :-P - and my Dior Rose Diamond Highlighter/Powder for blusher... I really hope you like it because I loveeeeeee it!!

Sono rimasta ipnotizzata dalla bellezza di Natalie Portman e del suo make-up nella pubblicità per il profumo Miss Dior, così chic e "semplice" che non ho potuto non ricrearlo!
Ho usato principalmente colori della palette Storm di Sleek -link here- sono sicura che i signori di Dior abbiano usato gli stessi prodotti :-P - e Dior Rose Diamond Highlighter/Powder sulle gaunce e sugli rigomi come blush... spero proprio che vi piaccia!


1- From the Sleek Storm Palette, I used the light champagne all over the lid,
2- With an angled brush I then traced a thick line along the upper lash line mixing the blue from the Storm Palette and the Stila Botura Matte eye-shadow.
3- I then applied a tiny amount of the pink from the Storm Palette along the crease
4- With a pencil brush I lined the lower lash line with Bourjois Violet Absolu
5- Plenty of mascara on top and bottom lashes
6- A soft swipe of Dior Rose Diamond - more the rosy side - along my cheek bone and apple of the cheek!


1- Dalla Palette Storm di Sleek, ho sfumato il colore champgne su tutta la palpebra,
2- Con un pennello angolato ho poi delineato con una linea spessa, lungo le ciglia superiori, combinando il blu della palette Storm di Sleek e il viola matte si Stila, Botura.
3- Sempre dalla palette Storm di Sleek, ho utilizzato il colore rosa chiaro sfumandolo nella piega dell'occhio per dare un po' di dimensione allo sguardo
4- Con un pennello a punta fina ho poi delineato la linea inferiore delle ciglia con il numero 72, Viola Absolute, di Bourjois.
5- Abbondante mascara sulle ciglia superiori e inferiori,
6- Un leggero tocco di Dior Rose Diamond sulle guance -  prendendo il prodotto più dalla parte rosata della palettina... e il gioco è fatto!


Bourjois 72 Viole Absolu, Sleek Storm Palette - Light Champaign, Light Pink, Blue
Stila Batura, Dior Rose Diamond.


Sunday, 24 February 2013

Let's go CLUBbing


Club Club Club.... one of the most famous eye shadow by Mac, a silky and smooth
 duo-chrome green colour with a warm brown hint..

this is really a fabulous shade that can suit all eye colours! The red undertones are perfect for green and blue eyes and the green hues enhance brown's ... I love to use it on its own but here I matched it with some more lovely shadows... 

Club Club club... uno degli ombretti più famosi di Mac, setoso e morbido, è un verde duo-chrome con un sottotono di un intenso e caldo marrone..
è veramente un colore eccezionale che va bene con ogni colore di occhi! Il sottotono marrone è perfetto per occhi verdi e blu e la sfumatura verde fa risaltare gli occhi color nocciola.

Adoro usare Club come unico ombretto su tutta la palpebra, ma qui l'ho accompagnato con altri bellissimi colori... 


Clockwise: Mac Yoghurt, Mac Swiss Chocolate, Mac Club, Mac Scene, U/D Half Backed and Revlon Cream Eyeshadow

1 - Mac Yoghurt on the brow bone,
2- Mac Swiss Chocolate along the crease and lower lash line,
3- Revlon green cream eye shadow all over the lid,
4- Mac Club over the cream eye shadow and close to the lower lash line,
5- Mac Scene used to soften Swiss Chocolate and Club in the crease and to darken 
the outer corner,
6- Urban Decay Half Baked used in the inner corned as highlighter
7- Plenty of mascara on the lashes and black eye pencil in the waterline!

1- Mac Yoghurt sull'arcata sopraccigliare,
2- Mac Swiss Chocolate nella piega e lungo le ciglia inferiori,
3- Ombretto verde in crema di Revlon come base sulla palpebra mobile,
4- Mac Club sulla palpebra mobile e lungo la linea inferiore delle ciglia,
5 - Mac Scene utilizzato per sfumare Swiss Chocolate e Club insieme e per intensificare l'angolo esterno,
6- Half Baked di Urban Decay come illuminante nell'angolo interno,
7- Tanto mascara e matita nella rima interna!


Hope you enjoyed it! 
x


Sunday, 26 August 2012

turquoise smokey eye look - uno smokey facile e veloce


Happy Sunday everyone!
a few days ago I was watching one of Clio Makeup's videos - Makeup tutorial Trucco Smoky Facile e Sexy solo con 1 colore - and I thought that it was a good idea to adapt her amazing and deep smokey eye look to something more suitable to my style and my eye shape... in the end I came out with something different but still smokey and with one main eyeshadow colour.


The first thing is to start with the eye makeup and leave the rest of the face for later in order to avoid to mess up your foundation with the dark eyeshadow..
I started by applying some concealer on my lid instead of a primer and then I layered the Plumage e/s, starting from the centre of the lid upwards keeping the colour above the crease. Then I applied the Maybelline eyeliner along the lower lash line up to the outer corner and Revlon Navy eyeliner along the upper lash line to intensify the base of the lashes. I noticed that using the concealer as a base allows a great staying power but it actually makes the eyeshadow a bit difficult to blend so I had to apply Mac Phone Number Kohl pencil on the lid and because it is a very soft pencil, it really helped me to get a very uniform and intense colour. 
I know that Clio actually used only one colour but I felt the need to add something extra and I lightly blended the Pupa Natural Eyes in no.03 -  in the crease in order to have a softer conjunction with the thin layer of Pupa Luminys Silk used as brow bone highlighter. Last but not least is mascara, applied only on the upper lashes, pink blush on the cheeks and a pale pink lipgloss on the lips...This is actually a very easy look to achieve and can be done playing with different combination of colours: my tip is to have a q-tip soaked with eye makeup remover and shape the eyeshadow as you prefer: it will give you clean, sharp edges that are very easy to soften with a flesh-toned eyeshadow!
I hope you like it!

Pupa Luminys Silk no. 200
Pupa Natural Eyes no. 03

Mac Plumage e/s

Beauty Uk no. 2 royal rose

Mac Eye Kohl in Phone Number

Revlon Colourstay eyeliner in Navy
Rimmel waterproof eyedefiner no. 240 aqua sparkle
Nars Lipgloss in Turkish Delight
Collection 2000 concealer in no.3
Lacura Highlighting Pen


Nars Lipgloss in Turkish Delight, Mac Eye Kohl in Phone Number, Revlon  Eyeliner in Navy, Rimmel Eyedefiner in Aqua Sparckle, Mac e/s in Plumage

Mac 217, 1£ brush, Urban Decay Eyeshadow Brush, Elf Contour Brush and Elf Bamboo Eyeshadow Blending Brush

Qualche giorno fa guardavo il video di Clio's video - Makeup tutorial Trucco Smoky Facile e Sexy solo con 1 colore- e mi è venuta l'idea di modificare il suo bellissimo smokey e creare qualcosa più adatto al mio taglio di occhi e al mio stile... il risultato finale è uno smokey bicolore molto sfumato verso l'esterno, adatto soprattutto per chi ha gli occhi piccoli perché la matita chiara delinea l'occhio senza rimpicciolirlo ulteriormente... 
 
Prima di tutto vi consiglio di dedicarvi al trucco occhi e poi pensare alla base visto che useremo un ombretto scuro e certo non vogliamo proprio che i pigmenti si mischino al correttore o al fondotinta... Ho applicato una leggera base di correttore su tutta la palpebra e iniziato ad applicare l'ombretto Plumage di Mac - diciamo un paio di strati - senza preoccuparmi troppo dei bordi... ho proseguito delineando la parte inferiore con la matita turchese Maybelline lungo la linea inferiore delle ciglia e quella blu scuro di Revlon lungo la linea superiore, per intensificare la base delle ciglia. Ho inoltre notato che utilizzare il correttore come base è ottimo per la durata dell’ombretto, ma rende la sfumatura un po’ difficoltosa e quindi ho dovuto ritoccare l’ombretto con un po’ di Mac Kohl in Phone Number, sfumandoli insieme. Per rendere più uniforme la transizione tra palpebra mobile e palpebra fissa, ho poi sfumato il tutto con Pupa Natural Eyes no. 03 e aggiunto un po' di luce sotto l'arcata sopraccigliare con Pupa Luminys Silk no. 200... una passata si mascara solo sulle ciglia superiori, un pizzico di blush rosa e un po' di gloss rosa pallido e il gioco è fatto!

Il mio consiglio è quello di stendere l'ombretto scuro e poi delineare la forma che desideriamo utilizzando un cotton fioc imbevuto di struccante e poi sfumare i bordi con l'ombretto color carne o marrone chiaro: questo ci permette di creare facilmente il bellissimo ed elegante effetto cat eye!


Spero vi piaccia
x